Forresst's Blog
MenuInstaller Jekyll sous Windows
Jekyll est un moteur d’analyse pour construire des sites Web statiques à partir de composants dynamiques tels que les templates, les partiels, le code de liquide, markdown, etc. Jekyll est intégré dans Github, il est donc possible de créer un blog qui sera hébergé par Github. Ce blog est créé avec Jekyll et hébergé par Github.
Comme moi, vous aurez peut être besoin de faire des tests sur votre propre machine. Dans mon cas, je suis sous Windows, donc il faut que j’installe Jekyll sur mon PC.
Jekyll est développé sous Ruby et la manière la plus simple pour l’installer c’est d’utiliser RubyGems. Rubygems est un utilitaire qui gère l’installation ou la désinstallation d’applications ou de librairies contenus dans des paquets appelés gemme. Rubygems permet l’installation locale, à partir d’un fichier .gem ou distant depuis le site http://rubyforge.org
###I) Pré-requis
Pour installer Jekyll, il faut installer Ruby et RubyGems.
Pour Ruby, vous pouvez trouver différentes versions de l’installateur “RubyInstaller” sur la page de télécharchement. La dernière version disponible à l’heure où j’écris ces lignes est la 1.9.3. Voici le lien pour télécharger directement l’exécutable.
Cette exécutable contient RubyGems, toutefois cette version est incomplète. Il faut installer en plus le “DEVELOPMENT KIT” qui se trouve sur la même page de téléchargement que “RubyInstaller”. Voici le lien pour télécharger directement le fichier.
Vous avez donc maintenant deux fichiers à votre disposition :
-
rubyinstaller-1.9.3-p125.exe
-
DevKit-tdm-32-4.5.2-20111229-1559-sfx.exe
###II) Installation
####II-1) Installer Ruby
1°) Lancez l’exécutable rubyinstaller-1.9.3-p125.exe.
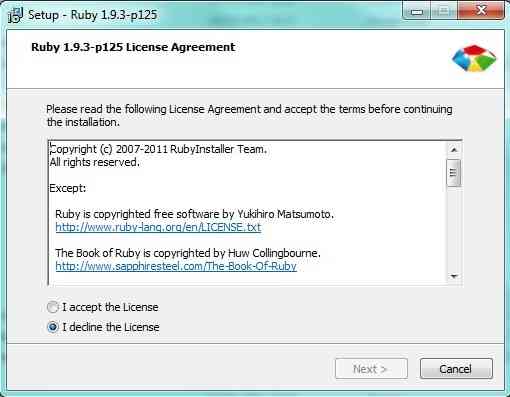
2°) Sur la première fenêtre, choisissez “I accept the Licence”, puis cliquez sur le bouton “Next”.
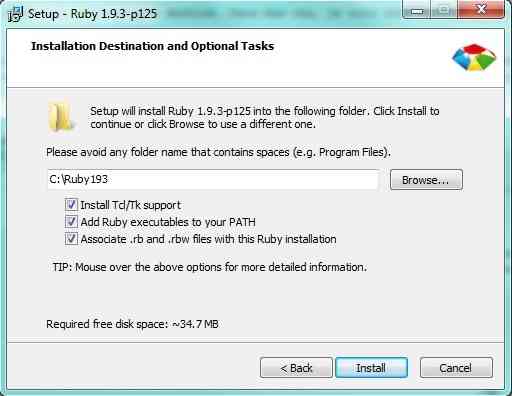
3°) Sur la deuxième fenêtre, choisissez le répertoire d’installation (Par défaut “C:\Ruby193”, mais vous pouvez le modifier. Dans l’exemple d’installation, je garde ce répertoire. Ce nom de répertoire sera réutilisé). Puis cochez les trois options et cliquez sur le bouton “Install” :
-
“Install Tcl/Tk support” : utile pour la suite
-
“Add Ruby executables to your PATH” : cela permet de lancer ruby facilement dans n’importe quel répertoire
-
“Associate .rb and .rwb files with this Ruby installation” : utile pour la suite
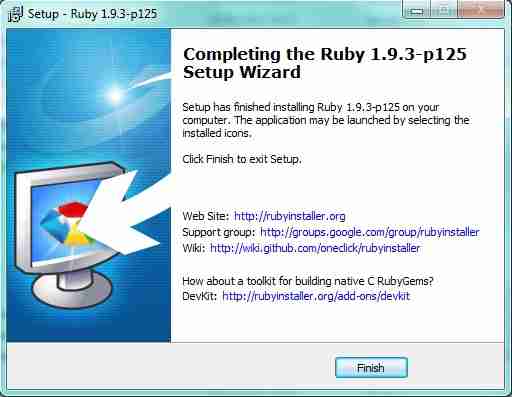
4°) Lorsque l’installation est terminée, cliquez sur le bouton “Finish”.
####II-2) Installer le “DEVELOPMENT KIT”
1°) Lancer l’exécutable DevKit-tdm-32-4.5.2-20111229-1559-sfx.exe
2°) Sur la nouvelle fenêtre, préciser le répertoire suivant : “C:\Ruby193\DevKit". Cela permet d’intégrer le “Development Kit” dans un sous répertoire de Ruby. Puis cliquez sur le bouton “Extract”.
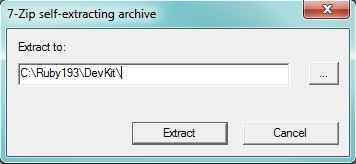
Cela permet d’extraire les fichiers nécessaires pour installer le “Development Kit”.
3°) Ouvrez une fenêtre d’invite de commandes (cmd), placez vous dans le répertoire c:\Ruby193\DevKit et exécutez la commande initialisation (ruby dk.rb init) :
c:\>cd c:\Ruby193\DevKit
c:\Ruby193\DevKit>ruby dk.rb init
Vous obtiendrez le résultat suivant :
[INFO] found RubyInstaller v1.9.3 at C:/Ruby193

Initialization complete! Please review and modify the auto-generated
'config.yml' file to ensure it contains the root directories to all
of the installed Rubies you want enhanced by the DevKit.
4°) Ensuite lancez l’installation (ruby dk.rb install) :
c:\Ruby193\DevKit>ruby dk.rb installVous obtiendrez le résultat suivant :
[INFO] Updating convenience notice gem override for 'C:/Ruby193'
[INFO] Installing 'C:/Ruby193/lib/ruby/site_ruby/devkit.rb'
A partir de maintenant, vous avez RubyGems installé correctement.
####II-3) Installer Jekyll
1°) Pour installer Jekyll, cela devient très facile grâce à RubyGems, il suffit simplement de lancer l’installation via la ligne de commande suivante :
c:\Ruby193>gem install jekyllVous obtiendrez le résultat suivant :
Fetching: liquid-2.3.0.gem (100%)
Fetching: fast-stemmer-1.0.0.gem (100%)
Temporarily enhancing PATH to include DevKit...
Building native extensions.  This could take a while...
Fetching: classifier-1.3.3.gem (100%)
Fetching: directory_watcher-1.4.1.gem (100%)
Fetching: syntax-1.0.0.gem (100%)
Fetching: maruku-0.6.0.gem (100%)
Fetching: kramdown-0.13.5.gem (100%)
Fetching: posix-spawn-0.3.6.gem (100%)
Building native extensions.  This could take a while...
Fetching: albino-1.3.3.gem (100%)
Fetching: jekyll-0.11.2.gem (100%)
Successfully installed liquid-2.3.0
Successfully installed fast-stemmer-1.0.0
Successfully installed classifier-1.3.3
Successfully installed directory_watcher-1.4.1
Successfully installed syntax-1.0.0
Successfully installed maruku-0.6.0
Successfully installed kramdown-0.13.5
Successfully installed posix-spawn-0.3.6
Successfully installed albino-1.3.3
Successfully installed jekyll-0.11.2
10 gems installed
Installing ri documentation for liquid-2.3.0...
Installing ri documentation for fast-stemmer-1.0.0...
Installing ri documentation for classifier-1.3.3...
Installing ri documentation for directory_watcher-1.4.1...
Installing ri documentation for syntax-1.0.0...
Installing ri documentation for maruku-0.6.0...
Couldn't find file to include 'MaRuKu.txt' from lib/maruku.rb
Installing ri documentation for kramdown-0.13.5...
Installing ri documentation for posix-spawn-0.3.6...
Installing ri documentation for albino-1.3.3...
Installing ri documentation for jekyll-0.11.2...
Installing RDoc documentation for liquid-2.3.0...
Installing RDoc documentation for fast-stemmer-1.0.0...
Installing RDoc documentation for classifier-1.3.3...
Installing RDoc documentation for directory_watcher-1.4.1...
Installing RDoc documentation for syntax-1.0.0...
Installing RDoc documentation for maruku-0.6.0...
Couldn't find file to include 'MaRuKu.txt' from lib/maruku.rb
Installing RDoc documentation for kramdown-0.13.5...
Installing RDoc documentation for posix-spawn-0.3.6...
Installing RDoc documentation for albino-1.3.3...
Installing RDoc documentation for jekyll-0.11.2...
RubyGems installe Jekyll ainsi que toutes les dépendances utiles pour Jekyll.
2°) Nous allons installer un gem complémentaire : rdiscount.
c:\Ruby193>gem install rdiscountVous obtiendrez le résultat suivant :
Fetching: rdiscount-1.6.8.gem (100%)
Temporarily enhancing PATH to include DevKit...
Building native extensions.  This could take a while...
Successfully installed rdiscount-1.6.8
1 gem installed
Installing ri documentation for rdiscount-1.6.8...
Installing RDoc documentation for rdiscount-1.6.8...
###III) Utilisation
####Tester avec les données de ce blog
Pour tester Jekyll en local, je vous propose de télécharger ce blog. Veuillez suivre ce lien qui contient un fichier zippé du blog.
Dézippez le fichier où bon vous semble (par exemple c:\forresst.github.com). Puis positionnez vous par une invite de commande dans ce répertoire. Toujours par l’invite de commande lancez Jekyll :
c:\forresst.github.com>jekyll --serverLe serveur Jekyll est maintenant opérationnel. Attention, ne fermez pas la fenêtre d’invite de commande, sinon vous arrêter le serveur.
Enfin, ouvrez votre navigateur préféré et tapez l’adresse localhost:4000, vous devez normalement voir apparaitre le blog.
###IV) Astuces
####IV-1) Problème de codage de caractère
Lorsque vous lancer le serveur Jekyll (jekyll –server) sous Windows, vous avez de grande chance de voir apparaitre cette erreur : “Liquid Exception: incompatible character encodings: CP850 and UTF-8 in post”. Ce problème est du à l’encodage des fichiers qui sont en UTF-8, alors que Windows travaille sous l’encodage CP850. Voici un exemple d’erreur :
c:\forresst.github.com>jekyll --server
C:/Ruby193/lib/ruby/site_ruby/1.9.1/rubygems/custom_require.rb:36:in `require': iconv will be deprecated in the future, use String#encode instead.
Configuration from c:/forresst.github.com/_config.yml
Auto-regenerating enabled: c:/forresst.github.com -> c:/forresst.github.com/_site
[2012-03-18 16:17:46] regeneration: 42 files changed
Liquid Exception: incompatible character encodings: CP850 and UTF-8 in post
Liquid Exception: incompatible character encodings: CP850 and UTF-8 in post
Liquid Exception: incompatible character encodings: UTF-8 and CP850 in post
Liquid Exception: incompatible character encodings: CP850 and UTF-8 in post
Liquid Exception: incompatible character encodings: CP850 and UTF-8 in post
Liquid Exception: incompatible character encodings: UTF-8 and CP850 in post
Liquid Exception: incompatible character encodings: CP850 and UTF-8 in post
Liquid Exception: incompatible character encodings: CP850 and UTF-8 in post
[2012-03-18 16:17:47] INFO  WEBrick 1.3.1
[2012-03-18 16:17:47] INFO  ruby 1.9.3 (2012-02-16) [i386-mingw32]
[2012-03-18 16:17:47] INFO  WEBrick::HTTPServer#start: pid=6756 port=4000
Ces erreurs peuvent avoir un impact sur l’affichage du blog. Et même dans certains cas, cela peut empêcher le bon fonctionnement de Jekyll. Il existe une parade à ce problème. Il suffit simplement de lancer les commandes suivantes avant de lancer le serveur Jekyll :
set LC_ALL=en_US.UTF-8
set LANG=en_US.UTF-8
Cette commande permet de dire à Windows que l’encodage a utilisé est l’UTF-8. Si vous relancez Jekyll après cette manipulation, ces errurs auront disparus.
####IV-2) La mise en évidence ne fonctionne pas
Grâce à Pygments (qui est inclus dans Jekyll), vous pouvez mettre en évidence votre code. Par exemple, pour mettre du javascript en évidence, vous devez entourer votre code entre {% highlight javascript %} et {% endhighlight %}. Vous pouvez trouvez plus de détail sur cette page. Et voici un exemple de code javascript :
//collapse page navs after use
$(function(){
	$('body').delegate('.content-secondary .ui-collapsible-content', 'click',  function(){
		$(this).trigger("collapse");
	});
});


// Turn off AJAX for local file browsing
if ( location.protocol.substr(0,4)  === 'file' ||
     location.protocol.substr(0,11) === '*-extension' ||
     location.protocol.substr(0,6)  === 'widget' ) {
...
Là encore, sous Windows, cela ne fonctionne pas, le résultat du code est souvent remplacé par Liquid error: Bad file descriptor.
Il existe un patch à utiliser sur le gem albino (aussi inclus dans Jekyll). Pour la version 1.3.3, il faut modifier le fichier C:\ruby193\lib\ruby\gems\1.9.1\gems\albino-1.3.3\lib\albino.rb, voici le fichier complet modifié :
require 'posix-spawn'
require 'rbconfig'

##
# Wrapper for the Pygments command line tool, pygmentize.
#
# Pygments: http://pygments.org/
#
# Assumes pygmentize is in the path.  If not, set its location
# with Albino.bin = '/path/to/pygmentize'
#
# Use like so:
#
#   @syntaxer = Albino.new('puts "Hello World"', :ruby)
#   puts @syntaxer.colorize
#
# This'll print out an HTMLized, Ruby-highlighted version
# of '/some/file.rb'.
#
# To use another formatter, pass it as the third argument:
#
#   @syntaxer = Albino.new('puts "Hello World"', :ruby, :bbcode)
#   puts @syntaxer.colorize
#
# You can also use the #colorize class method:
#
#   puts Albino.colorize('puts "Hello World"', :ruby)
#
# To format a file, pass a file stream:
#
#   puts Albino.colorize(File.new('/some/file.rb'), :ruby)
#
# Another also: you get a #to_s, for somewhat nicer use in Rails views.
#
#   ... helper file ...
#   def highlight(text)
#     Albino.new(text, :ruby)
#   end
#
#   ... view file ...
#   <%= highlight text %>
#
# The default lexer is 'text'.  You need to specify a lexer yourself;
# because we are using STDIN there is no auto-detect.
#
# To see all lexers and formatters available, run `pygmentize -L`.
#
# Chris Wanstrath // chris@ozmm.org
#         GitHub // http://github.com
#
class Albino
  class ShellArgumentError < ArgumentError; end
  include POSIX::Spawn

  VERSION = '1.3.3'

  class << self
    attr_accessor :bin, :timeout_threshold
    attr_reader :default_encoding

    def default_encoding=(encoding)
      # make sure the encoding is valid
      Encoding.find(encoding) if defined?(Encoding)

      @default_encoding = encoding
    end
  end

  self.timeout_threshold = 10
  self.default_encoding  = 'utf-8'
  self.bin = 'pygmentize'

  def self.colorize(*args)
    new(*args).colorize
  end

  def initialize(target, lexer = :text, format = :html, encoding = self.class.default_encoding)
    @target  = target
    @options = { :l => lexer, :f => format, :O => "encoding=#{encoding}" }
    @encoding = encoding
  end

  def execute(options = {})
    proc_options = {}
    proc_options[:timeout] = options.delete(:timeout) || self.class.timeout_threshold
    command = convert_options(options)
    command.unshift(bin)
    if RbConfig::CONFIG['host_os'] =~ /(mingw|mswin)/
      output = ''
      IO.popen(command, mode='r+') do |p|
        p.write @target
        p.close_write
        output = p.read.strip
      end
      output
    else
      Child.new(*(command + [proc_options.merge(:input => write_target)]))
    end
  end

  def colorize(options = {})
    out = RbConfig::CONFIG['host_os'] =~ /(mingw|mswin)/ ? execute(options) : execute(options).out

    # markdown requires block elements on their own line
    out.sub!(%r{</pre></div>\Z}, "</pre>\n</div>")

    # covert output to the encoding we told pygmentize to use
    out.force_encoding(@encoding) if out.respond_to?(:force_encoding)

    out
  end
  alias_method :to_s, :colorize

  def convert_options(options = {})
    @options.merge(options).inject([]) do |memo, (flag, value)|
      validate_shell_args(flag.to_s, value.to_s)
      memo << "-#{flag}" << value.to_s
    end
  end

  def write_target
    if @target.respond_to?(:read)
      out = @target.read
      @target.close
      out
    else
      @target.to_s
    end
  end

  def validate_shell_args(flag, value)
    if flag !~ /^[a-z]+$/i
      raise ShellArgumentError, "Flag is invalid: #{flag.inspect}"
    end
    if value !~ /^[a-z0-9\-\_\+\=\#\,\s]+$/i
      raise ShellArgumentError, "Flag value is invalid: -#{flag} #{value.inspect}"
    end
  end

  def bin
    self.class.bin
  end
end